Mavic 3M in Low-Light Field Monitoring: A Practical Manual
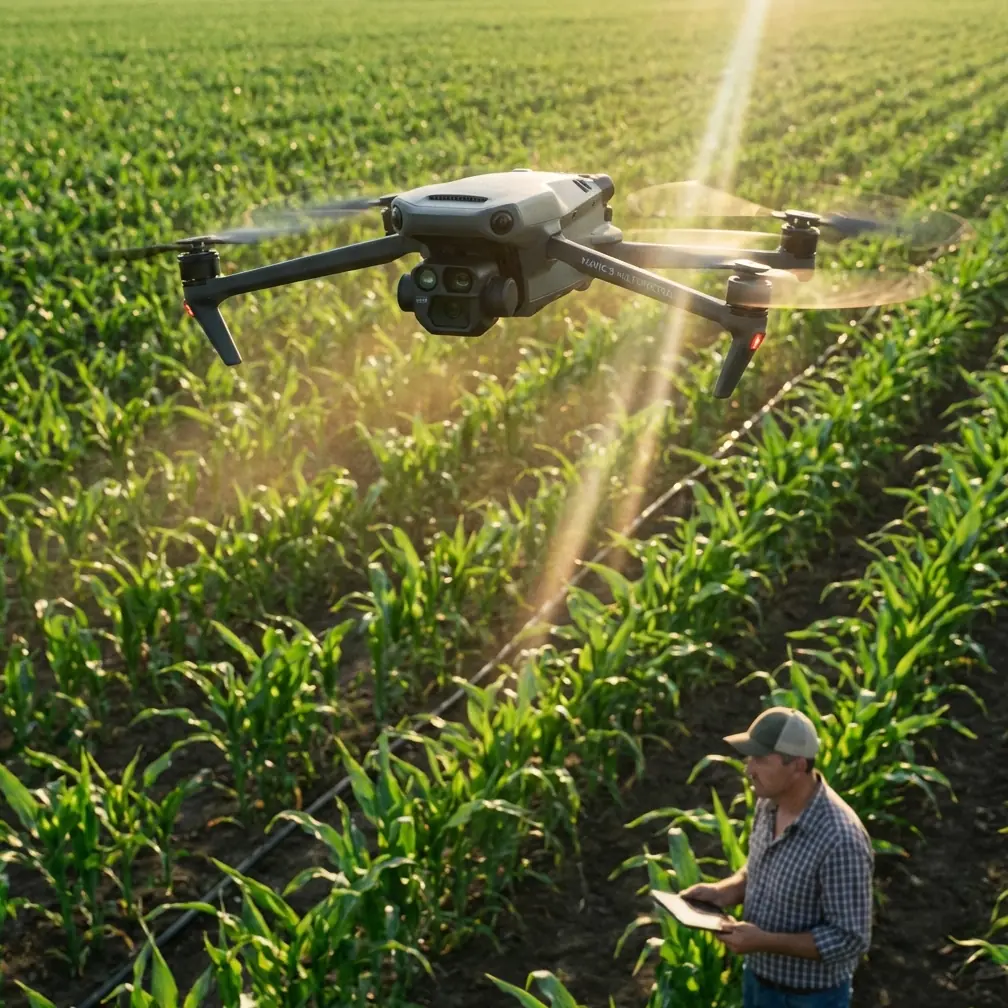
Mavic 3M in Low-Light Field Monitoring: A Practical Manual for Better Data When Auto Decisions Fall Short
META: Learn how to use the Mavic 3M more effectively for low-light crop monitoring, with practical advice on multispectral capture, RTK fix stability, electromagnetic interference handling, and field-ready workflow decisions.
Most Mavic 3M pilots are leaving useful data on the table for one simple reason: they trust automation too much when conditions get messy.
That usually works at midday over clean, open acreage. It starts to break down at dawn, near dusk, around tree lines, beside metal irrigation systems, and anywhere electromagnetic noise or weak light pushes the aircraft and sensor stack out of their comfort zone. If your job is to monitor fields in low light, “just let the drone handle it” is not a serious operating strategy.
I’ve seen a similar pattern outside aviation. A recent camera article made a sharp point using phones: people ignore manual or “Pro” mode because the settings look intimidating, yet a budget phone in Pro mode was able to produce a clearer night image than a flagship phone left in auto. That result matters here more than it may seem. The lesson is not about phones. It is about control. When the environment gets difficult, operators who understand the numbers often beat operators with better hardware but weaker technique.
That mindset is exactly how to get more from the Mavic 3M.
Why low-light monitoring with the Mavic 3M demands operator input
The Mavic 3M is often discussed as if multispectral sensing makes field assessment automatic. It doesn’t. The aircraft is highly capable, but low-light monitoring still depends on a chain of human decisions: mission timing, altitude, swath width, overlap, RTK readiness, and the way you react when the site introduces interference.
In bright, stable conditions, poor settings can be masked by plenty of usable light and forgiving signal quality. In low light, every weak choice becomes visible in the output. A shaky RTK fix rate can undermine map alignment. Marginal overlap can leave thin areas in reconstruction. Flying too aggressively to cover more hectares can reduce consistency right when the sensor needs steadier conditions. If you are also running nearby machinery, pumps, power distribution, or communication equipment, electromagnetic interference can quietly add one more variable.
The result is familiar: maps that look acceptable at first glance but lack confidence when you actually try to make agronomic decisions.
The core shift: stop treating the Mavic 3M like a point-and-shoot
The best low-light Mavic 3M workflow starts with one principle: use the aircraft as a measurement tool, not a flying camera that happens to make pretty maps.
That sounds obvious, but it changes everything.
A lot of pilots approach agricultural monitoring the way casual smartphone users approach photography. They open the app, trust default behavior, and hope the system makes smart choices. The phone article I mentioned earlier promised direct settings for 10 scenarios because many users need help translating abstract parameters into real-world action. Drone operators are not so different. They may know the broad concepts, yet still struggle to convert them into repeatable field technique.
For Mavic 3M work in low light, you need your own version of those “copy this setup” habits. Not rigid recipes, but structured decisions.
Start with mission timing, not aircraft settings
Low-light field monitoring is often done for a reason. Maybe you want to avoid harsh daytime reflectance. Maybe your agronomy schedule only allows early or late flights. Maybe wind tends to rise after sunrise and drift becomes a concern later in the morning, especially if the field team is coordinating around spray drift risk or checking patterns after nozzle calibration work. Fine. But once you choose those windows, you must accept the tradeoffs they create for imaging quality and positioning reliability.
The first question is not, “What settings should I use?” It is, “Is this the right moment for a mapping-grade mission?”
Look at:
- Ambient light consistency across the block
- Presence of fog, dew, or haze
- Nearby electrical infrastructure
- Metallic obstacles or irrigation spans
- Whether you can maintain strong RTK performance across the whole route
This is where many weak missions begin. Pilots are eager to launch and only react when warnings appear. A better operator checks the environment first, then decides whether to tighten the plan before takeoff.
RTK fix rate is not a box to tick
Low-light monitoring often exposes something pilots tend to overlook in easier conditions: RTK fix quality has operational significance far beyond the startup screen.
Centimeter precision is only meaningful when the fix is stable throughout the mission. If the aircraft keeps shifting between high-confidence positioning and degraded states, your map quality can suffer even if each individual image looks fine. That matters for crop comparison over time, emergence assessment, drainage evaluation, and localized stress tracking where consistency is everything.
I tell teams to stop asking, “Do we have RTK?” and start asking, “How solid is the RTK fix rate across the actual working area?”
That one distinction changes preflight behavior. You begin checking the edges of the field, not just the launch point. You become more cautious near structures. You think about line-of-sight to the correction source. And if you see instability, you adjust the mission geometry before committing to a full capture.
Low light by itself does not ruin RTK, of course. But low-light missions often happen during marginal conditions when additional variables stack together. That is why disciplined RTK assessment matters more in these windows than in easy midday flights.
Handling electromagnetic interference with antenna adjustment
This is where field experience pays off.
When operators encounter electromagnetic interference, many either panic and abort too quickly or push ahead with denial. Neither response is useful. Interference is often manageable if you understand where it is coming from and how your communication setup interacts with it.
A practical first step is antenna adjustment. On a field edge near power infrastructure or dense equipment, a small change in controller orientation can improve link stability more than people expect. The goal is not random fiddling. The goal is to maintain cleaner alignment between controller antennas and the aircraft while minimizing shielding from your own body, truck, or nearby metal objects.
A few field rules help:
- Don’t stand right beside the source of interference if you can move.
- Reorient yourself before reconfiguring the whole mission.
- Keep the controller in a deliberate position rather than letting it hang casually.
- Test signal behavior while the aircraft is still in a controllable, conservative position.
- Watch whether the issue is site-specific or route-specific.
If interference worsens at only one side of the field, redesign the mission so the aircraft spends less time in the noisiest corridor, or move the launch point to improve geometry. That is a far better response than forcing the original plan and hoping the data cleans up later.
For teams that want a second set of eyes on field interference behavior or route planning, I often suggest sending screenshots and site notes here: message a Mavic 3M workflow specialist.
Multispectral data is only as useful as the consistency behind it
“Multispectral” sounds like a guarantee of insight. It isn’t. It is a richer data source, which is not the same thing as a trustworthy one.
In low light, consistency matters more than raw capability. If the mission is flown with erratic speed, uneven overlap, unstable altitude behavior, or unreliable positioning, the multispectral output can become harder to trust when you compare one zone with another or one date with the next.
This is why swath width should be treated carefully. A wider swath can improve efficiency, but in marginal conditions it also raises the cost of each weakness. If overlap thins out or image quality drops toward the edges of the working pattern, your processing confidence can erode. In practical terms, a slightly more conservative flight plan often beats an ambitious one when light is limited.
Field managers usually care less about finishing five minutes faster than they do about making a confident call on crop stress, stand variability, or drainage issues. Build the mission around that reality.
Borrow the “10 scenarios” mindset for repeatable drone operations
One of the smartest ideas in that phone camera article was not the tech itself. It was the teaching method. The article promised 10 shooting scenarios that readers could copy directly. That approach recognizes a simple truth: people learn faster when they can connect theory to specific situations.
Drone teams should do the same with the Mavic 3M.
Build your own scenario library for low-light agriculture. Not generic SOPs buried in a binder. Real scenarios you actually face, such as:
- Dawn flight over open flat ground
- Late-day mission beside metal irrigation systems
- Early morning route after overnight moisture
- Low-light monitoring near pump stations
- Marginal signal area at the far edge of an orchard block
- Mapping after nozzle calibration checks to verify application uniformity patterns
- Stress scouting where spray drift concerns require tight coordination with treatment timing
For each scenario, document what worked:
- Launch point
- Antenna orientation
- Preferred route direction
- RTK behavior
- Safe swath width
- Wind observations
- Processing notes afterward
This is how expert teams get sharper over time. They do not rely on memory and they do not pretend every field is the same.
Low-light data collection is really about reducing compounding errors
Most disappointing Mavic 3M missions are not ruined by one dramatic failure. They are weakened by three or four modest mistakes that compound.
A pilot launches from a convenient spot rather than the best one. The RTK fix looks acceptable but not strong. The field edge introduces interference. The route is a little too wide for the available light. The aircraft completes the mission, so everyone assumes it went well. Then the map is inconsistent where it matters most.
That is the central discipline of low-light monitoring: identify small weaknesses before they stack.
If I had to reduce the whole workflow to one sentence, it would be this: when conditions are marginal, tighten the variables you can control rather than trusting software to smooth them out later.
A practical field sequence for Mavic 3M low-light monitoring
Here is the field order I recommend.
1. Survey the site before powering into mission mode
Walk the launch area. Look for power lines, metal structures, active pumps, parked equipment, and anything likely to affect signal behavior. Decide whether your first planned launch point still makes sense.
2. Confirm the field’s weak zones
Do not assume the problem area is where you think it is. The corner near a road may be cleaner than the center beside energized infrastructure. Learn the field, not just the map.
3. Check RTK performance across the intended route
Centimeter precision is only valuable if it holds where the aircraft will actually work. A strong reading at takeoff does not guarantee stability over the whole block.
4. Reduce ambition if light is poor
Use a more conservative swath width and prioritize overlap and consistency. Efficiency is useless if the output becomes questionable.
5. Fly the first segment as a test, not a commitment
Watch the link, aircraft behavior, and signal pattern early. If interference appears, adjust your antenna position and controller orientation before assuming the site is unflyable.
6. Log what happened
Good teams improve because they document what changed and what solved it.
The bigger lesson
The Mavic 3M is a very capable platform for agricultural monitoring, but low-light performance is not a product feature you switch on. It is an operator discipline.
That is why the smartphone camera analogy is so useful. The article’s strongest point was not just that Pro mode can outperform auto mode. It was that users often avoid better results because they are put off by the numbers and labels. Drone operators can do the same thing. They let automation make decisions they should be supervising, especially when conditions are tricky.
The pilots who consistently produce cleaner field intelligence with the Mavic 3M are usually not the ones chasing complexity. They are the ones who understand what matters when the environment stops being forgiving: stable RTK fix rate, realistic swath width, disciplined multispectral capture, and calm correction of electromagnetic interference through basic steps like antenna adjustment and launch-point refinement.
That is expert monitoring. Not flashy. Just repeatable, controlled, and credible when the light is working against you.
Ready for your own Mavic 3M? Contact our team for expert consultation.